The Bogey Golfer © Course Guides
Highland Meadows - Overview
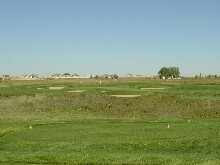
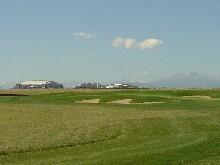
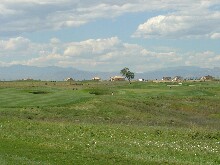
Highland Meadows is a brand new (open June 2004) golf course located in Windsor (CO). Despite the youth of the course, it was already in great shape at opening the grass was thriving everywhere the rough was thick and lush, the fairways were evenly sodded and closely mowed, and the greens were completely filled in and running fast. The practice facilities are ample a driving range, a putting green, and even a sand trap next to the chipping green.
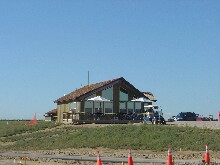
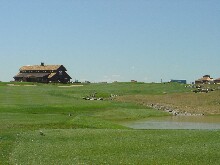
The clubhouse was still a bit sparse (the deck was still under construction, they didnt have clubs and balls for sale yet), and they werent due to get their liquor license until the day after I played there the first time. The golf carts have GPS, the help is friendly, the views are to die for, and the weather was gorgeous.
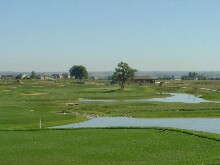
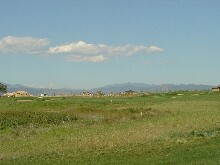
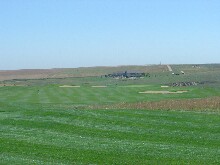
The course design is tough but fair. Its holes alternate between this one is wide open, so haul off and smack it as hard as you can, and target golf, thread the needle, dont waver a bit. The greens have a lot of undulations, but they roll true. The course is also walkable. A few of the holes have some elevation changes, but its certainly no worse than nearby Mariana Butte in Loveland. And unlike courses like Vista Ridge, the holes are contiguous to each other for the most part (no quarter-mile drives). The wind can be a factor, since the course basically sits on a high plains ridge. Pay attention to the wind when selecting clubs, and when aligning your shots.
The first time I played Highland Meadows, I played from the blue tees (6562 yards). For total length its not out of reach of a bogey golfer, but there are a couple of holes (Ill point them out) where a bogey golfer should seriously consider hitting from the whites. The back tees are 7011 yards, so theres plenty of challenge for your par-shooting friends. The white tees are 6059 yards, and theres some teeth in the course even from the whites.
|
Highland Meadows Course Detail
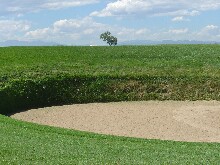
The first hole is a par 5. At 546 yards, its a par-able hole, even for us bogey golfers. But you have to stay awake. The first thing you have to do is understand what youre looking at. The hole has a split fairway. The right side was designed by the Marquis de Sade to reward golfers who can reliably hit a three wood 250 yards, straight. Ignore it. Its not useful to us. Furthermore, you have to hit the damn ball 200 yards on the fly over the grunge even to reach it. Then you have to hit it another 200 yards on the fly across the pond. Who needs that? Take the obvious route to the hole, namely up the left side. The fairway is generous. Pay attention to the yardages to the various bunkers so that you dont fritter away the generous fairway youve been handed by wasting a shot getting out of the sand. Do not go straight at the pin on your second shot. A little hill where that tree sits hides the fact that the pond curls in front of the green. Theres also a bunker immediately in front of the green, so if you arent coming in from a good angle, be prepared to lay up.
The second hole is a pretty straightforward par 4. Its only 340 yards, so you dont need a driver to play the hole well. Use a three wood or even a long iron if it helps you be more accurate off the tee.
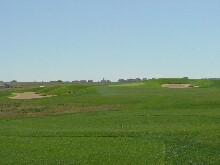
The third hole, a par 4 at 442 yards, is a bit more lengthy, and you will need your driver off the tee. Fortunately, the fairway on this hole is huge, so you can really grip it and rip it. Theres a hundred and fifty yards of forced carry over the grunge, so make sure you get plenty of altitude on your tee shot. On your second shot, theres a fairway bunker in the middle of the fairway down near the green that comes into play.
The fourth hole is a short par 3 (131 yards). However, with the pond wrapping around to the right, its an interesting test. Its better to be just a little too long, than a little too short. Take an extra club, even if it does leave you with a downhill chip off the hill behind the green. The best miss is left. A rightward miss brings more and more of that pond into play
Number 5 is a 551 yard par 5. The fairway is plenty wide if youd like to hit your driver. Theres a bunker on the left of the fairway that makes a pretty good target. A ho-hum mid iron second shot sets you up pretty well for your approach to the green. The green, however, is fully 40 yards from front to back, so pay close attention to the pin placement on your approach shot.
Number 6 is a 418 yard par 4. This is truly a gnarly hole. Its kind of long, but it also requires accuracy because of a bottomless canyon you have to go over approaching the green. Theres plenty of room for your tee shot to land, but depending on the line you take, you should strongly consider laying up with your second shot. Most of us bogey golfers arent going to clear the nasty stuff if our second shots are 200 yards to the green. For the record, the ideal line to take off the tee is over the bunker on the left. Ideal here also requires a 200 yard forced carry to get over the trap, not to mention the grunge leading up to it. Theres no room left if you pull it. If you hit the shot successfully, then youre set to use a seven or eight iron to cross the canyon. This is a dangerous plan for us bogey golfers. A better strategy is to hit your tee shot into the fairway right of the trap, and then lay up by getting as close to the edge of the canyon as you can (without going in!), and then attacking the green on your third shot. Theres a bunker short and right of the green. Dont worry about it! Your main objective is just to get across the canyon. If you wind up in the bunker, so be it! Bogey is a pretty good score here.
Number 7 is only a par 3, but it crosses the same bottomless canyon. Its 150 yards or so, so theres no reason to get panicky. But you do need a well-struck ball!
Number 8 is a 422 yard par 4, uphill. The combination of length and uphill would indicate to the bogey golfer to plan on taking three shots to get home. With a bit of forced carry off the tee, and fairway bunkers everywhere, you might want to strongly consider hitting an iron instead of a wood (I say this because I have a tendency to hit my woods thin, which is the wrong thing to do on this tee shot). Many of us bogey golfers tend to stress out when faced with long distances. Relax, plan to take three shots to reach the green, and focus on hitting the ball well. Three well-struck six or seven irons will make you feel pretty good. A topped drive, or a penalty drop out of the grunge will just irritate you.
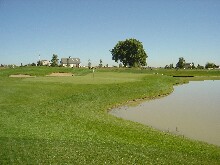
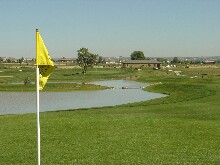
Number 9 is a strategic hole. Its not very long (only 349 yards), and theres plenty of room for your tee shot, but theres also plenty of trouble if you get careless. Off the tee, theres a big lake on your right. At the far end of the lake, theres a waterfall feeding it. What you cant see is that the waterfall comes out of another little pond up by the right side of the green. Stay away from the right side. The distance you save by going up the right side doesnt help since its a short hole anyway. Theres a sand trap in the middle of the fairway. Stay left of it to be conservative. Big hitters can fly over the trap if they hit a driver. But theres really no need to try and do that. Anything left of that trap will still leave you with less than 150 yards in to the green. Beware the pond on the right of the green a little bit of rightward drift on your approach shot will be punished, so favor the left side of the green, and this hole can be had.
Hole #10 is a straightforward, ho-hum par 4. Its 378 yards, and what you see is what you get. Keep the ball in the fairway off the tee, and youll set up an easy bogey, or even a par.
Hole #11 is an interesting par 3. At 150 yards, us bogey golfers can aspire to pars here. However, #11 makes you earn it. The green is another long narrow affair, and the length here is mostly stretched out sideways. There is a bunker behind the green to catch anything which is hit too aggressively, and theres a bunker on the front left to shield a back left pin placement. Dont hit to the wrong side of the green theres a ridge in the middle that will make it really hard to correctly gauge the distance, and a three-putt is not the worst thing that can happen to you.
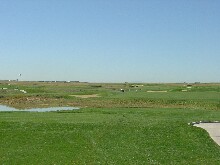
Hole #12 is a long par 5 at 599 yards. Nothing you do off the tee is likely to get you home in two shots, so the important thing is to keep the ball in the fairway. A bunker on the right will catch any tee shots with a bit of fade in them, so adjust your setup accordingly. On your fairway shots, select clubs that you feel confident in your ability to strike well, and hit straight. Demonstrating a puzzling failure to follow my own advice, I a) hit my tee shot into that fairway bunker, and then b) tried to hit it out with a three wood. This led to a richly deserved seven. Keep the ball in play, and youll be rewarded with an easy six, or even a five.
Hole #13 is a scary 209 yard par 3, but its all mental. From the tee, you see a vast expanse of grunge in front of you, and then far below, the green. Dont panic. Once you get off the tee, youll find that the grunge only lasts about 100 yards, and then theres a nice fairway spilling off the hill down toward the hole. So either a) play this shot from the white tee (186 yards), or just pick a club you have confidence in, even if it wont reach. Chipping on from in front of the green lets you get an easy bogey, and leaves you a fighting chance for a par. Dont do what I did, which is to stress out by hitting a long iron as hard as I could into the weeds, and eventually rolling up six strokes.
Hole #14s tee box is back up the hill (#13 is kind of a cul-de-sac). Its 436 yards, downhill. It is another split fairway hole, although you cant really tell the first time you play it. The first time you play this hole, play it the way you see it namely aim at the sand traps on the left in order to go around the grunge area in front of the tee box. Be sure to take one less club than normal as youre coming down the hill toward the green. What you wont see until later is that the grunge area actually ends, and the fairway splits, and another grunge area is planted in the middle of the fairway around the 150 yard marker. Taking a three wood just to the right of the 150 marker with a little bit of fade might be fun to try sometime - look for that downhill kick in the split fairway. But its a blind shot off the tee, which I always find disconcerting. The right hand tee shot straight at the pin leaves the most favorable approach to the hole (the one down the hill from the left comes over a sand trap). However, it also has the longest forced carry over the weeds. The white tees are 397 yards, which is still a respectable length for a par 4. That extra 40 yards will take a lot of the confusion out of this hole.
Hole #15 is a short (479 yards) but nasty par 5. The nastiness is because all the tee shots are across a bottomless canyon. The challenge becomes to a) pick the right line for your distance, and b) strike the ball solidly and get it up in the air. A big hitter can bite off a pretty aggressive line across the canyon, and end up with as little as a hundred yards on the second shot into the green (as the crow flies, its only about 380 to the hole off the tee). Big hitter here means the ball has to fly (not just travel, but fly) 250 yards. Thats well out of reach for most of us bogey golfers. Pick a less aggressive line, and you only need to fly 150 yards or so, and you can still easily reach the green in three. Get too greedy and therere big numbers to be had here!
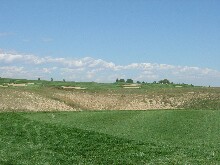
Hole #16 looks like it was modeled after St. Andrews or Ballybunion. Its only 325 yards, and is definitely drivable by a big hitter. But it is guarded in front by two cavernous bunkers. Cavernous is the operative word here. The vertical faces of these bunkers are easily 8 feet high. The Bogey Golfers advice? Hit a five or six iron off the tee, stay left to shorten the carry over the grunge, and then hit an 8 or 9 iron over those bunkers onto the green. This hole can be had if you keep your wits about you.
Hole #17 is a deceptively easy-looking 186-yard par 3. Its deceptive on several counts. First of all, if you go left into the bunkers in front of the green, youll find the green is elevated about 10 feet when you go to hit out. Second, the green is 40 or 50 yards long. You can land your tee shot front right and have difficulty three-putting if the pin is back left. Third, theres a bunker on the right waiting to gobble you up if youre afraid of the ones on the left. Fourth, the green slopes away to the back from the middle. Hit a shot that lands in the middle, and it might well roll off. The par golfers need to shape their shots into the green, and fire at the pin. Bogey golfers are well-advised to land short right, and bump and run their second shots on to the green.
Hole #18 is a great finishing hole to make you feel like youve earned that post-round beer. Its 441 yards, slightly up hill (you can save 30 yards by playing the whites). For most of us bogey golfers, its likely going to take three shots unless you really whack your tee shot with your driver. Heck, its the last hole, go ahead and try! There are bunkers that will gobble up anything thats offline. Having said that, the fairway is plenty wide. The green is a real piece of work. It's a good forty yards from front to back, full of undulations, and surrounded by burms and traps. The favored approach for the bogey golfer is to land your second shot short and left, and chip on from there. All the other chip-ons are horrible. Of course, sticking your second shot in the middle of the green can work. I guess. Theoretically.
For post-round refreshments, the pickings were slim here. They were building a deck on the North side of the clubhouse, but it wasnt completed as of this writing. They sold bottled water and soft drinks out of a refrigerator inside, and again, hadnt received their liquor license yet. Reviews of the snack bar will have to come another day.
Bottom line great course, fun for all skill levels, give it a try! Lots of trouble to be had, but the average bogey golfer should do okay as long as you plan your shots according to what you can actually pull off.
|