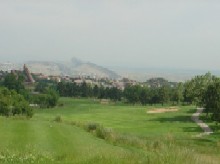
Arrowhead Course Detail
Hole #1 Longish par 4 at 431. Fortunately its downhill so you get a little help. Since the hole has some distance, and theres lots of landing room, use your driver. A word of caution: Theres a swamp short and left that you dont see very well on your approach shot if the pin is back left, make sure youve got enough club to carry. Better yet, dont go for it if its back left. I didnt have enough club, and the pin was front right. (I also didnt realize the swamp was there). Be sure to stay right as youre coming in to this one.
Hole #2 Long uphill par 5 525 yards feels more like 600+. The rough is punitive keep the ball in play. You need distance here because of the uphill. Driver off the tee, and long irons off the fairway. If you cant hit your driver or your long irons straight, take four shots to get there, but stay in the fairway!
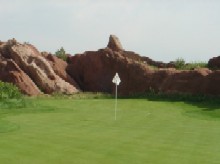
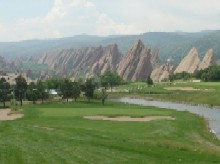
Hole #3 Gorgeous par 3 nestled in amongst the red rocks. The green is really long, so pay close attention to the pin placement if youre going for it. Landing short right and bumping up onto the green is a good strategy regardless of pin placement. As a brief aside, I have to tell an amusing story on my playing partner. For reasons we wont go into, he wound up in the sand trap on the front left of the green. Since the wheels were falling off anyway, he picked it clean, and lofted the shot completely over the green, where it hit the rock wall on the other side. You guessed it
the ball caromed back across the green and rolled back into the trap at his feet.
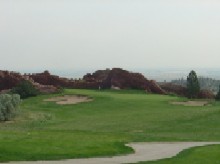
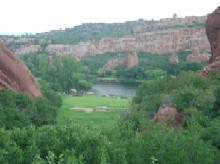
Hole #4 Great downhill hole with a chasm to cross before coming into a visually stunning green with a huge cliff backdrop. Pay close attention to your yardages here. Plan on your tee shot getting an extra 20 yards of carry because of the elevation. The green is very deceptive in its breaks, sloping severely from back to front. Pay attention!
Hole #5 Back across the chasm, this short par 4 dogleg right has a humongous rock formation keeping you from cutting the corner. Hit a long iron or a fairway wood. Just aim anywhere left of the rock formation and youll have anywhere from 150 to 75 yards coming into the elevated green.
Hole #6 The tees are nestled in amongst a rock formation. Favor the right side of the fairway, because the slope wants to drag everything into the left rough. Also, once you get to the green, theres a huge bunker on the left side.
Hole #7 is a strategy hole. Theres a pond about 30 yards in past the 150 marker, and a sandtrap down the left side. There is NOT room to squeeze between the trap and the pond. The black tees are only 350 yards, so do not hit it much further than 200 yards up the middle. Aim at the pond, not the trap (the trap is closer, and a 200 yard shot might roll in). Although it doesnt appear so from the fairway, the green slopes severely from left to right, so dont hit any fades coming in (at least on purpose) or the ball will roll off the right side.
Hole #8 is an uphill par 4. The fairway is like a chute or a funnel (raised sides). At 383 yards, youll need all the distance you can get off the teebox because of the uphill slope, so go ahead and use your driver (be mindful of the bunker on the right if youre a big hitter). The green is elevated, and has a backstop above it, so make sure you use plenty of club on your approach shot.
Hole #9 is a short downhill par 3. The hole will play 15-20 yards shorter than whatever it says the distance is. The scorecard says 177, but find the yardage disk on the tee box to double-check sometimes they move the tees around, you know.
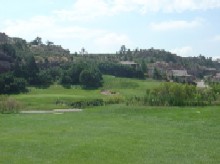
Hole #10 might well be the most beautiful hole in golf (no, I dont want to hear about Pebble Beach or Pinehurst or Ballybunion). The distracting scenery makes it hard to hit the fairway. Its only 398 yards, and you get a lot of help from the elevation, so dont pull out the driver here. Use a club youre confident you can hit straight. The green is well protected, so lay up on your second shot if you have to.
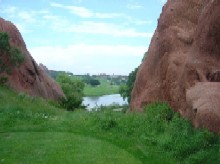
Hole #11 is a par 3 backing into another huge rock formation. The green is pretty big, so feel free to go for the pin here, wherever it is.
Hole #12 is another 400 yard par 4 that feels more like 450 because of the elevation gain. You need a good tee shot, and the fairway is going to feel pretty narrow because of the angle you want to take to reach the 150 yard marker. Slow your swing down keep uphill thoughts out of your head!
Hole #13 is a breathtaking par 3 off what feels like a cliff. Back off two full clubs from whatever distance the tees put you at. Theres nowhere to land short, so once youve made your club selection, take a full swing.
Hole #14 is another stunning hole especially if you want to go back and play it from the golds. (Even if you dont play it from the back, you owe it to yourself to go up there and look at it!) The back tees put you in a notch in a rock formation, teeing off from an elevated tee across a lake. You need a 200 yard carry to clear the lake. Its a gorgeous hole. The green is really wide, and not very deep. Try to come in from the right, because the left is well guarded by bunkers.
Hole #15 is another uphill par 4. Like #5 on the front, you have to go around a huge rock formation. At 361, the hole is not terribly long, but the uphill slope is enough that you need to take at least one extra club to reach the green. The bunker on the right basically wraps all the way around the back of the green, so stay away from it!
Hole #16 is a reasonably benign par 5. Its uphill, which effectively adds 30-40 yards to its not inconsiderable 549 yard length, but the fairway is nice and wide, so go ahead and hammer away on your tee shot. Hit a solid mid iron or long iron on your second shot, and keep it in play. You need a good setup for the approach shot into the green. Theres a valley of rough right in front of the green that wont help you, so take enough club and rap it smartly!
Hole #17 is a tasty medium length par 3, over a pond . If you have a tendency to stray a bit right, make sure youve got enough club to carry the pond.
Hole #18 is a par 5 coming back up a huge hill. Theres a sign warning you that its 250 yards to reach the water. What you cant see from the tee box is that the fairway basically dead-ends over the hill where you cant see from the tee box. Because of the hill, its unlikely (but not impossible) that youll hit into the lake. Once you get up the hill, youll see that theres another fairway on the right side of the lake that you need to get to. The green is huge, so theres a good chance to make a score to feel good about as you finish the round.
This course is a real treat. The green fees run from $90 to $125 (based on midweek vs. weekend, and off season), which is a bit pricey, but the wow factor is incredible. If you ever come across any discount coupons that you arent able to use, please forward them to me!!!
|